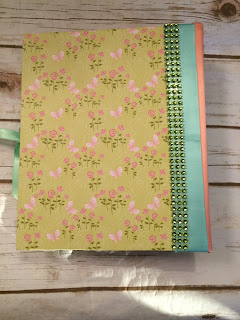
This beauty was made with EK Success Disney Specialty Paper-Princess with some coordinating stickers and die cuts all of which I got from A.C.Moore. Pictured above is the cover of the album. The album itself was made from a tutorial from the fabulous Kathy King of Paper Phenomenon. The name of the tutorial is the All Occasions Mini Album 2 which can be found here. I modified this tutorial somewhat with the construction of the pages in this album. I love how easy her tutorials are easy to follow with clear instructions and pictures so you know exactly what you are doing. So back to the front cover. I took a background paper from the paper pad to use on the front and used a die cut sticker I picked up that displays most of the princesses and use that to decorate the front cover along with some heart shaped rhinestone gems and some green rhinestone wrap. On the spine is ribbon in two coordinating colors. And on the back is a pretty floral paper from the pad with more green rhinestone wrap. I used a ribbon closure as once you add the pictures the album will be really chunky!
On the inside of the front and back covers are papers that display the princesses. I didn't add anything additional to the inside covers as I wanted to show the princesses. The first page is a split page that can hold 4 pictures if you don't mind covering up the designer paper or 2 if you just want to put the pictures on the back. Each page shows you were you place your photos so you don't have to guess where to put them. Of course you can add more pictures in outside of where I have designated in the album.
I tried to include as many princesses as possible in this album without making it to big. The second page has a long pocket that hold 2 photos mats and decorated with a chipboard embellishment. The next page is an undercut pocket page that holds another photo mat and place for a photo on the pocket.
This page has a vertical belly band that holds more photo mats with a castle embellishment. The next page displays one of the princesses with some chipboard stickers.
This page is a short pocket page with 2 more photo mats and on the apposite page is another split page that displays Snow White and one of the dwarfs. Both pages I used paper die cuts to add the princesses.
You have probably noticed that the album pages are now repeating which they are. This album uses the same page construction for each page.
I also used the same number of photo mats for both the horizontal and vertical pocket pages. You can display 4x6 photos as well as 3x3 photos on the mats as to have some variety.
I added some vertical flaps a few of the pages as well for some variety and add addition places to display photos. I used matching color cardstock for these.
I love Tiana so of course I had to add her in there as well. :)
This is the inside back cover shows more princesses along with the last page which is another vertical belly band. Since this was the last page, I loaded band with lots of photo mats. This album easily holds over 50 photos so it would be a great gift or to display some family photos.
Next post I will be showcasing a recipe album!
Until next time...


